The Neapolitan Soul: Authentic Pizza Dough for a Taste of Napoli
Authentic Neapolitan Pizza Dough — A refined expression of Naples’s culinary heritage.
Traditionally crafted with finely milled ’00’ flour and slow-fermented yeast, this Gustoli-exclusive version is optimized for elevated digestibility and vibrant flavor.
Ready in 24 hours 20 minutes (including fermentation), it seamlessly bridges authentic Italian tradition with modern nutritional excellence.
Beyond the Plate: The Story of Authentic Neapolitan Pizza Dough
Mastering the Technique
A step-by-step guide to Italian perfection
The Artisan’s Pantry
Selecting the right components is 70% of the Italian culinary success. Here is what I’ve curated for this Authentic Neapolitan Pizza Dough:
- Four cups (20 ounces) finely milled ‘Tipo 00’ bread flour — Gustoli Tip: For the true Neapolitan experience, seek out a finely milled ‘Tipo 00’ flour. Its low protein content is crucial for that characteristic delicate, airy crust.
- Four teaspoons (0.4 ounces) pristine flaky sea salt — Expert Tip: Fine salt ensures even distribution without overworking the gluten structure. It also enhances the dough’s elasticity and flavor.
- Two teaspoons (0.3 ounces) premium instant dry yeast — Pro-Tip: Ensure your yeast is fresh and active. Warm, not hot, water is its gentle awakening.
- Thirteen ounces (about 1⅔ cups) filtered, lukewarm water — Gustoli’s Secret: The exact temperature of your water influences yeast activity and dough texture. Aim for around 95-105°F (35-40°C).
The Culinary Workflow
-
The Initial Blend: Hydrating the Flour
First, measure your finely milled ‘Tipo 00’ flour into a large mixing bowl. Add the flaky sea salt and the instant dry yeast, scattering them evenly. Use a wooden spoon or your clean hands to combine these dry ingredients gently.
Listen for the subtle rustle as the ingredients meld. You want a harmonious mixture, without any clumps of salt or yeast. This sets the stage for uniform hydration later.
My shortcut here is simple: always sift your flour. It introduces air, making the dough lighter, and ensures all particles are finely separated for perfect blending. This little step makes a big difference.
-
The Merge: Bringing Water to the Mix
Next, gradually pour the lukewarm water into the dry mixture. Start with about three-quarters of the water, mixing with a wooden spoon until a shaggy, rough dough forms. Slowly add the remaining water, ensuring all the flour is incorporated.
Watch how the flour absorbs the water. It will look sticky and uneven at first. Don’t worry; this is natural. The dough should feel hydrated but not soupy.
Here is a trick: reserve a tiny splash of water. You might not need it all, or you might need a drop more depending on your flour and ambient humidity. Trust your intuition with the dough’s feel.
-
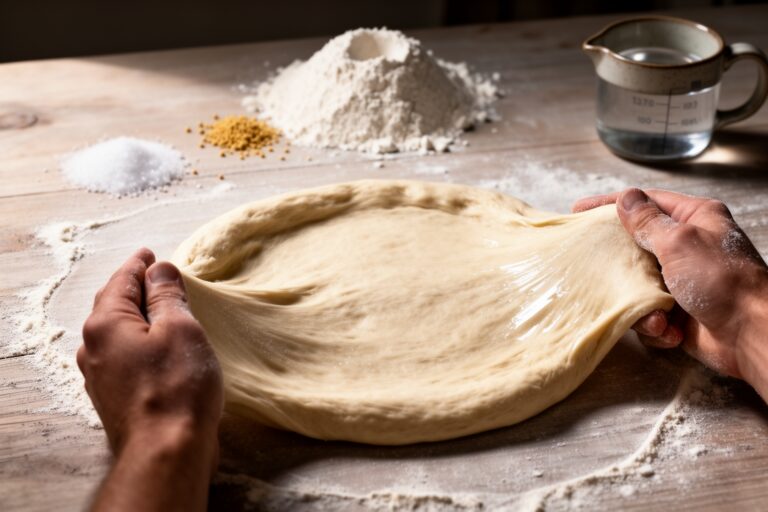
The Knead: Developing Structure and Elasticity
Turn the shaggy dough out onto a lightly floured surface. Begin to knead with purpose. Push the dough away with the heels of your hands, then fold it back over itself, rotating slightly after each fold.
Feel the dough transform under your touch. It will start sticky, but as you work it, it will become smoother, more elastic, and less tacky. Aim for about 10-15 minutes of vigorous kneading until it passes the “windowpane test”—stretch a small piece; if you can see light through it without it tearing, your gluten is well developed.
I personally find this part meditative. If your arms tire, take a short break. The dough will continue to develop even while resting, thanks to autolysis. Remember, patience is a key ingredient in Italian baking, much like preparing fresh pasta.
-
The First Rest: Bulk Fermentation
Form the kneaded dough into a smooth ball. Lightly oil a large bowl, place the dough inside, and turn it once to coat. Cover the bowl tightly with plastic wrap or a damp cloth to prevent a skin from forming.
Place the dough in a warm, draft-free spot. Observe its gentle rise. It should double in size over 1.5 to 2 hours. This initial fermentation builds crucial flavor and structure.
To be honest, for the truest Neapolitan flavor, I always recommend a long, cold fermentation. After an hour at room temperature, transfer the dough to the refrigerator for 18-24 hours. This slow proof develops profound depth of flavor and texture that a quick rise simply cannot match. It’s perfect for planning ahead for your evening pizza, perhaps with a delicious homemade tomato sauce.
-
The Divide: Shaping the Pizza Balls
Once the dough has completed its first fermentation (either warm or cold), gently turn it out onto a lightly floured surface. Do not punch it down aggressively; you want to preserve the airy bubbles.
Divide the dough into three equal portions, each weighing about 9-10 ounces (250-280 grams). Each portion will become one medium pizza. Form each piece into a taut, smooth ball using a gentle stretching and tucking motion to create surface tension.
My personal tip for perfect balls: fold the edges towards the center, then flip the dough over and cup it with your hand, rotating it against the counter to create a smooth, tight skin. This surface tension is vital for a good rise in the oven.
-
The Final Pause: Second Proofing
Place the dough balls on a lightly floured surface or in individual proofing boxes, making sure they have space to expand. Cover them loosely with plastic wrap or a damp cloth.
Allow the dough balls to proof at room temperature for another 1-2 hours, or until visibly puffy and expanded. They should feel soft and airy to the touch. This final rest prepares them for the intense heat of your oven.
For best results, aim to use the dough within 2-4 hours after this final proof. This is when its elasticity and flavor are at their peak. Now, you are ready to top and bake your authentic Neapolitan pizzas, perhaps even exploring vegan pizza toppings from our dedicated section!
Alessia’s Expert Secrets
Achieving the perfect, airy crumb and blistered crust hinges on the ‘Tipo 00’ flour and a long, slow fermentation. Don’t rush the process; the gluten development and gas production over time are what give that desirable chewiness and light texture.
This dough is the foundation for almost any pizza creation. For a classic Neapolitan, simply use a vibrant San Marzano tomato sauce, fresh mozzarella, and a drizzle of exquisite olive oil. Pair it with a crisp, dry white wine like a Greco di Tufo or a light, effervescent Lambrusco. For other baked goods, consider the rustic charm of focaccia as another excellent application for a similar dough base.
Recipe Insights & Tips
Why is ‘Tipo 00’ flour essential for this dish?
Tipo ’00’ flour, often called “doppio zero,” is a finely milled Italian flour with a lower protein content than typical bread flour. This unique characteristic allows it to develop a very soft, elastic gluten structure, yielding the thin, light, and airy crust with characteristic leopard-spotted charring that defines authentic Neapolitan pizza. Using it is key to achieving that delicate bite.
How does this fit into a Longevity diet?
This pizza dough, especially when cold-fermented, offers excellent benefits for a longevity diet. The long fermentation breaks down complex carbohydrates and gluten, making it easier to digest and potentially increasing nutrient availability. When topped with fresh vegetables and lean proteins, it aligns perfectly with the principles of the Mediterranean diet, supporting heart health and overall wellness.
Kcal
Wellness & Longevity Note
This authentic Neapolitan pizza dough, made with simple, high-quality ingredients, is a testament to mindful eating. The slow fermentation process not only enriches the flavor but also enhances its nutritional profile. It’s a naturally low-fat, dairy-free, and egg-free base, providing a foundation for a truly heart-healthy and digestible meal. By allowing the yeast to work slowly, complex starches are pre-digested, making for a lighter, more agreeable culinary experience that aligns beautifully with a longevity-focused lifestyle.